.NET for Domino Developers Part 5
Security, Sessions, and all that jazz
Let me first take the time to curse those things that I shall refer to as “RLC’s” (real life commitments), and their perpetual hold on our progress in this series. I apologize for the delay, so I will keep this installment as short as possible so I can deliver something that takes less than a week to digest.
Let’s do a little side by side comparison with what we have learned about .NET and what we know about Domino.
| With Domino: | With .NET |
| Page | Page |
| Form | FormView, DetailView |
| Fields/Buttons | Server Controls |
| Field Translation | Pre/Post Data Binding |
| Field Validation | Validation Controls |
Now we will dive into a topic that, as Domino developers, is near and dear to our hearts; security. The basic premise behind security is to make sure that the right users can see and do the right things when they are allowed. With Domino, the security hierarchy is very structured and very granular with security being applicable at seven levels: Server, database, view, document, form, section and field. Applying security at these levels is childs play in Domino which is one of its greatest strengths.
With .NET, the granularity is definitely there, but it does require more work. There are no “Hide when” formulas where you can enter a simple “@” formula to hide the data from the user, or to restrict their ability to edit the data. Yet, a simple line in the page_load event of a page can hide a field value even more securely than Domino, since there is no “document properties” dialog box to look at the data.

SideNote: Remember the multi-view object? That is a great tool for showing different layouts (editable vs read-only documents) under different security roles. In that case we would use syntax like Multiview.SetActiveView(”adminView”) inside an “if” statement in the page_load event.
By the way, if you have not figured this out yet, if you make a reference to an object/variable in your code when it does not exist (either declared in your code, or an object on the form), you will get the blue squiggly line under the object reference. If you mouse over the squiggly line a pop-up will tell you that “Name ’someTextBox’ is not declared”. Very nice way to avoid the dreaded “null reference” error that plagues me when I code in LotusScript (I sometimes forget to use “Option Declare”). You may also see a green squiggly line in your .NET code, and that is under an object that is delcared but never used, which is a good way to keep your code clean and not instantiate alot of objects that you are not using.
In comparison with Domino, you would place all of the .NET code that hide fields in the same event all clustered together, whereas with Domino it resides with every field object. So there are some drawbacks to the security model in .NET, but there is no doubt that it can do as good of a job, if not better.
Throughout this series, I have purposely steered you all toward what some would call “the difficult way” of doing something, but if you can do it the tough way, you can do it any way. With our little Help Desk application we will “roll our own” security model to demonstrate a number of other design features, but I want to first talk about “the easy way”.
.NET provides the developer an out-of-the-box / flip-a-switch security model that handles the management of users, passwords, groups, and roles. Its drawbacks are that you need to use either SQL Server 2005, or the new “Access on steroids” Express edition of SQL Server 2005. The express edition uses the access “MDF” file structure so it can reside within your application folders and would work well for small, departmental, and stand-alone applications. This shrink-wrapped approach is pretty well covered throughout the net and at one of my favorite sites; Four guys from Rolla. It is very powerful and there is alot of familiarity for Domino folks. But I said we would steer clear of the total Microsoft dependency in this series and do it “the old fashion way”.
SideNote: I do know of a customer that is rewriting one of the core enterprise systems in .NET and are going to roll their own security model in much the same fashion as we are. They are creating their own Membership class that will build off of the .NET membership classes, but they are using Oracle as the backend, and have no enterprise directory strategy. Hence, they have to do it this way to guarantee security and accessibility.
Besides, what better way is there to demonstrate the power of the Session object? This is something that I must say is Domino biggest failing as a web development platform; no access to the users session information. By that I mean that when the user logs into your site using Domino authentication, you cannot maintain information between the stateless HTTP requests unless you use unsecure cookies, or disk I/O intensive temporary documents. In our case, we are going to store the users credentials, their group memberships, and their roles in the Session object which will allow us to use that information anywhere in a .NET page for any purpose.
When I used to use the ASP 3.0 session object I would store nothing more than a boolean value to signify the users authentication, but a recent experience has taught me that keeping all the credentials in the session can be very valuable if you want to access secured web services from within your application. .NET has a way that you can impersonate a user when you make a web service request, and if your web services run on a different platform and do not share the Microsoft trust (like .NET to Domino), you can actually authenticate to the web service with the credentials you store in the session object.
What is the Session object? It is information stored about the user in the servers memory that is strongly tied to the browser session ID. Every time your browser starts, it generates a unique session ID that a web server/application uses to track the user across pages. Since it is tied to the session ID of the browser, other users cannot see this information which makes it a perfect place to store secure information. In addition, since it is in memory, it is fast. You can access this session information at almost any time in the page rendering timeline and it can govern which pages the user has access to, or which fields they can see on a form.

The type of information that can be stored in the session object is almost anything. It can be a strings, integers, floats, doubles, arrays, or even a custom data type that a web service returns. It resides in the servers memory for as long as the session is active, which is a function of your session timeout setting on your server, and the users activity. You can imagine the drawback, of course, would be very high memory utilization if you store too much information in the session object.
But that is nothing new to ASP or JSP developers, yet a new .NET 2.0 feature is new and cool; With a simple configuration change you can have all your session information stored in a database on another machine. This would be used where you have an application that is hosted in a server farm and the developer cannot guarantee that the user will return to the same server for every request, or a way to guarantee application integrity despite server crashes and restarts. This option also has two sub-options which allow you to use a specific SQL server, or a pre-installed service that is dedicated to storing session information. This option comes at the price of a 15% performance hit for the service, and 25% performance hit for the SQL server, so use this option sparingly. You can find more info on this topic over at the O’reilly Network.
One more note before we return to the Session object is to mention the difference between the Session object and the Cache object. Although the Session object is used as an information cache, since it is tied to the users session, Microsoft created another object to cache information on an application level. An example of using the application cache is a recent application that I did in .NET (in fact, it is the reason this article is a week late) that had 14 keyword fields where the user could select search criteria from. Some of these keyword fields had 300 options to choose from and to call these options from the database every page load would have been a killer. But the cool thing about the Cache object is its dependencies that you can set. .NET provides us with a way to preserve the cached information until certain conditions are met, like a certain amount of time has elapsed, or if a table has changed, and even if an xml file/feed has changed. When the conditions are met, the cache object is updated automatically. So you can cache a keyword list that comes from a Notes HTML view using the “ReadViewEntries” URL parameter, and when the view changes, the cache is updated. Very cool stuff. For more information on .NET’s caching features take a peak at the DevX gurus.
Back to the Session object. We will create a Login page for our application, that when the user enters their credentials and clicks submit, will verify the credentials against the table we created last time, and then write the credentials , and other info, into the session for use in the application. This will require that we create a new table and form(s) to tie users to roles, and since we have done alot with forms and tables already, I will leave the majority of the work up to you. In summary we will need a table with a column for the users unique ID number, and a column with the role name. In our keywords table, I added a category field so that we could store multiple types of keywords, and in this case a category of “Role” will serve nicely.
SideNote: I hope none of you think that I create the ugliest UI’s in history, but I hoped to cover more the inner workings of .NET now and leave the “fluff” for some later chapter. Hence why I have spent no time on making your forms look good.
Once you create your roles in the keyword table, the new role form will need three SqlDataSource objects; one to read from the keywords table (a DropDownList object can bind to this object), one to read from the user table, and the other to read/write from/to the roles table. This will require that we write a query that pulls information from multiple tables. For example, when you want to display all of the users with the roles they have, you will need a SQL query like this:
SELECT kw.kwName, roles.user_id, roles.role_group, users.firstname, users.lastname, users.username
FROM helpdesk.hd_keywords kw, helpdesk.hd_roles_groups roles, helpdesk.hd_users users
WHERE (kw.kwName = roles.role_group) AND (roles.user_id = users.id)
Sidenote: You can always use a single SqlDataSource on a form if you are prepared to do a little extra coding. Using multiple sources in an easy way to keep the statement simple, especially when some are only used for keyword lookups. In fact, to Domino developers, using multiple select statements is similar to using multiple @DbColumns throught your fields.
A few other hints:
- When you bind a DropDownList object to a DataSource you can have the dropdown use one field for the what the list displays, and another field for the value of each option. This is like using synonyms (some call them aliases) on your Domino keywords. In the properties of the dropdownlist are the options “DataTextField” and “DataValueField”, and with the user field, I display the user name, while the user ID is value that gets sent to the DB.
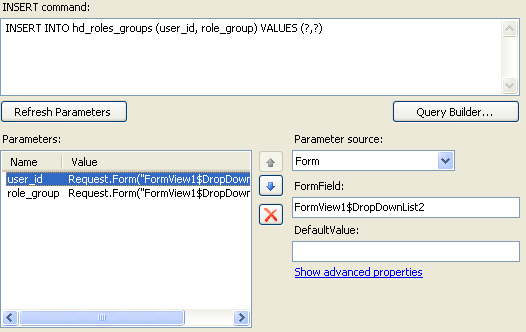
- When you replace the default fields that are generated in a FormView template, the parameter names in the SqlDataSource statement need to use the field names generated by .NET. In my code, I left the Dropdownlist name with the default “DropDownList1″, but if you look at the HTML of the form (in insert mode) you will see the a different name, which in my case was “FormView1$DropDownList1″. In my SqlDataSource insert statement, the parameters use the Form field with the names.
Now we can create a new page for Login purposes. This form is fairly easy in that all we need is a user name field, and a user password field, with a submit button. Within the buttons click event, we will check the credentials, store them if valid, and move on. The difference is that we are going to connect to the DB without the use of the SqlDataSource object.
In case you have not taken a peak at other parts of a .NET application, take a quick look into the web.config file in the solution explorer (right side of the screen). Notice one of the parameters is the connection string for our database? We’ll use that now to do an old fashion ODBC query. Mine looks like this:
<add name=”HomeHelpDesk” connectionString=”Dsn=Local;uid=helpdesk;pwd=passw0rd”
providerName=”System.Data.Odbc” />
So with our buttons click event (which .NET auto-creates for you when you double-click the button in design mode) we will place some code. First we declare some objects.
Dim md5Hasher As New System.Security.Cryptography.MD5CryptoServiceProvider
Dim encoder As New UTF8Encoding()
Dim hashedBytes As Byte()
Dim dbBytes As Byte()
Dim strConn As String = ConfigurationManager.ConnectionStrings("HomeHelpDesk").ConnectionString
Dim sqlConn As OdbcConnection = New OdbcConnection(strConn)
Dim strCommand As String
Dim strUserName As String = TextBox1.Text
Dim strPassword As String = TextBox2.Text
You will have to change your textbox names if you change them from the default. Notice we brought back our old MD5 hash friend from the last installment so we can do comparisons of our stored passwords and the one the user provides.
hashedBytes = md5Hasher.ComputeHash(Encoder.GetBytes(strPassword & strUserName))
strCommand = "SELECT h.username, h.password, r.role_group"
strCommand += " FROM helpdesk.hd_users h, hd_roles_groups r"
strCommand += " WHERE (h.username='" + strUserName + "') AND"
strCommand += " h.id = r.user_id"
sqlConn.Open()
Dim sqlAdapter As OdbcDataAdapter = New OdbcDataAdapter(strCommand, sqlConn)
Dim ds As DataSet = New DataSet
sqlAdapter.Fill(ds)
Here is where we encode our password that was “salted” with the username, and create a query that will find all the rows where the username matches. This query does a merge with the roles table to I can determine what role the user has. Then it grabs the record(s) and places them in a dataset. Next we determine if we get only one record (since usernames should be unique), and if so then compare passwords. If all is well, forward the user on to another page.
If ds.Tables(0).Rows.Count = 1 Then
       dbBytes = ds.Tables(0).Rows(0).Item("password")
       If dbBytes.ToString = hashedBytes.ToString Then
           Session("username") = strUserName
           Session("password") = strPassword
           Session("role") = ds.Tables(0).Rows(0).Item("role_group")
           Session("app") = "helpdesk"
           Response.Redirect("userread.aspx")
       Else
           Response.Redirect("login.aspx?err=wrongpass")
       End If
Else
       Response.Redirect("login.aspx?err=nouser&r=" + CType(ds.Tables(0).Rows.Count, String))
End If
sqlConn.Close()
I added the fake querystrings onto the redirects only to assist in the debugging process. Notice how we refer to the table in the dataset as an array? This is because the .NET dataset can have multiple tables, and is in fact an in-memory database that can be extremely powerful when you are combining data from multiple sources.
Anyway, if all is well, you would be forwarded to the userread.aspx page, but what about our security? Well, remember my “foo” method at the beginning? We are going to do something very similar in the page load event of the userread.aspx page. We are going to hide our “Create New User” button. So open up the “userread.aspx.vb” page, and place this little number in the page load event (if you do not have a page load event, just double click on the form in design mode).
If Session("role") = "User" Then
    Button2.Visible = False
End If
I have been very lazy with object naming so my create user button is only called button2. Since the Visible property of my button is set to True by default, my code has to hide the button if the users role = “User”. Now save everything, open the login.aspx page in the browser and type in some valid credentials. If all is well, you will only see the create user button if you have the admin role.
I mentioned early in this installment that there is an out-of-the-box authentication and security model that comes with .NET which is configured in the web.config file and applies all the security to your application, but with our simplistic (and db neutral) approach, we will have to protect each page with some additional code. Add onto the page load event of each page, some code that will either let the user pass (while hiding buttons, etc..), or redirect them to the login page.
If Session("app") = "helpdesk" Then
     If Session("role") = "User" Then
         Button2.Visible = False
     End If
Else
     Response.Redirect("login.aspx")
End If
Of course, the idea of placing all of this code into every page of an application would be a pain in the butt, our next topic (master pages and controls) will show it can be a no-brainer.
So there you have it, the power of the Session object as it applies to the basics of .NET security, where with a little code you can have total and granular control over every aspect of your applications.
January 26th, 2006 at 9:27 pm
I just had to add this e-mail I received:
Meyer CTR Kurt V
To: me
Date: Jan 26, 2006 6:12 PM
Subject: Criticism About .NET for Domino Developers Series
Jeff,
I was going to post this under Part 3 of the series, and then decided it would probably be better to email you.
First, if the screenshots and/or code in Part 3 contain errors, why didn’t you just redo it? My code doesn’t work right and I don’t know if it’s my goof or because the directions were erroneous.
Second, the PDF versions of your series don’t contain all of the screenshots available in the HTML versions. Were you aware of this?
Third, when creating the DetailsView in Part 2, you didn’t mention the requirement to click the Refresh Schema. I was stuck on this for awhile because my DetailView didn’t show the field names from the table until I refreshed the schema.
Fourth, it would have been nice if you had provided a little bit of guidance on installing and setting up mySQL server. I had to spend a bit of time digging around the mySQL reference to figure out how to install and set it up.
Fifth, should the data source for the DetailsView in Part3 be the second or first SqlDataSource?
January 26th, 2006 at 9:27 pm
and my response……
Wow Kurt, what to say….
1. If I had errors, you are the first to point them out, yet you did not tell me where the errors are. My only mention was that I might have confused some screenshots but I fixed everything that I knew of. If there are more I will gladly fix them.
2. I was not aware of the PDF issues. I will remove them until I can determine what the issue is.
3. I do not always run across the same issues as everyone else. If I mapped my fields correctly the first time then I would never have run across the issue. I did run across that issue at a later date and I mentioned it. I am not paid to do this series and it is nothing more than what I learn along the way. If I make a mistake, then you will too. I made that perfectly clear very early in the process.
4. As I mentioned in the second installment, I would be using MySQL but anyone can use almost any DB and the code would probably still work. I am writing about what I learn about .NET as it compares to Domino; not how to install MySQL. If you simply google “Install mysql” there is a deluge of references for all operating systems.
5. Good question. There is no difference which order the SqlDataSources appear since the various objets are bound to the ID of the datasource.
February 17th, 2006 at 5:45 pm
Jeff,
I know you make no money from this and I truly appreciate your efforts! Will you be making all five installments available in PDF? I downloaded 1, 2 and 3 before and I’d love to have the other two.
February 18th, 2006 at 4:35 pm
Hey Charles! Sorry for the delay. I took off the PDF’s since a few of them were missing images and I could not figure out why. Since I create all of my entries directly into the blog, I was using CutePDF writer to create PDF’s from the browser. You can get CutePDF from:
http://www.cutepdf.com/Products/CutePDF/Writer.asp
It installs as a print driver so you just print the page to that printer and you should be all set. BTW, I had planned on a part 6, but it seemed that interest dropped off after part 3. I am planning a part six, but it will probably be another 2 weeks.