.NET for Domino Developers Part 4
A more powerful form and view, and the need for validation.
Like a train wreck you just can’t turn away. If you have followed my disjointed ramblings so far then I hope the remaining installments will be easier to follow than the last. Let’s do a real quick recap of what we have covered:
1. The breadth of the .NET server objects
2. Page/form creation and positioning of controls
3. Binding data to server controls
4. How to use Multiview and View objects
5. How to use GridView and DetailView
Although using the MultiView object may have added some complexity to the keywords page we created, I think that binding data to objects like the GridView and DetailView objects is a quick and easy way to demonstrate .NET’s data binding model. In this installment we are going to create a more traditional form where different modes have a different look. I will also cover .NET’s very cool validation model and even a touch of application security with a custom authentication approach.
Early Sidenote: Since starting this series I have now acquired a SQL server license and I had been working on a paralell database during the last installment. I may have inadvertantly placed some screenshots or SQL code that may have not been 100% compatible. If you have any problems let me know and I will correct. This time around I will try to have SQL code for both.
So let’s get to it. This time around we are going to create a form to create/edit the users that are supported in our help desk application. For example purposes this application will function in a stand-alone authentication environment with each user having a profile that will contain, amongst other info, a username and password so they can access the application to create tickets, or check the status. The application will also have a public section that will be used to display frequently answered questions. I will also include some additional information about using LDAP, and windows authentication in your .NET apps.
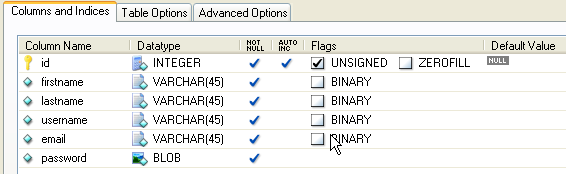
Our first task is to create a new table for our users. Refer back to the second installment for exact instructions on creating a new table, but on a high level we will need a table called “hd_users” with these fields and types:
Once the table is in place, create a new page by clicking the “Website” menu up top, and select “Add New Item”. From the options select the first one; “Web Form”, then set its name to “useredit.aspx”, leave the language at Visual Basic, and then select “Place code in seperate file”. I discussed this option in the last installment and my personal preference is to keep them seperate. You do not need to follow my lead, but all of my examples will use the seperate file.
Although I have co-workers who do everything from the “Source” view of a page, I still prefer to work in “Design” mode. Remember that you can choose the mode by clicking the appropriate tab at the bottom of the form pane.
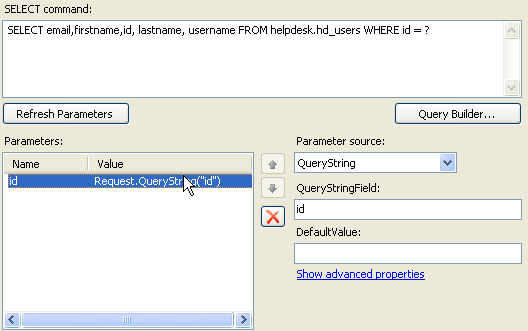
At the bottom of the page we will create our SQLDataSource object and set its SelectQuery property so it will extract the “ID” parameter from the querystring and use it in the statement. Your select should look something like “SELECT * FROM hd_users WHERE id = ?”, with the querystring id in the statement parameters.
Now above the datasource object drag a FormView object from the “Data” category of the toolbox. The FormView object is another databound control like the DetailsView object but has alot more control granularity so it requires a little more work to make it happen. Like all other data bound objects, the first task is to select the data source that the object will be bound to. Unless you renamed your SqlDataSource, select the data source for the FormView as “SqlDataSource1″. Once you select the data source, you will notice that the FormView object has created the default fields and labels just in the same way as the DetailsView object.
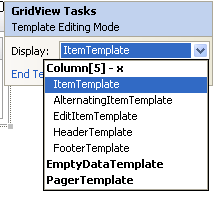
For display, the FormView object uses templates for the different “modes”. If you click the little arrow in the upper right corner of the FormView object, and click “Edit Templates” you can see the list of templates:
Item: let’s call this the “Read mode”
Footer: appears at the bottom of all items
EditItem: this is the template for editing existing entries
InsertItem: used for new entries
Header: appears at the top of all items
EmptyData: what to show when the sql query returns no data
Pager: You can do paging from the FormView object and the look and feel is set here
Let’s customize the templates with something in the EmptyData template. How about a simple message that there are no registered users with the specified id and a button to switch over the InsertItem template? Click on the little arrow in the upper right of the FormView object, select “Edit Templates”, and select the “EmptyData” template. Drag a Label control, and a Button control into the EmptyData template. Change the text property of the label to “No registered users with the specified id” and the text property of the button to “Create New User”. Now double click on the button to edit the code that will switch us to InsertItem mode.

Just like the DetailsView object, we have a ChangeMode method to switch over. Now save everything and view in browser. Click the Create New User button and we will see the Insert screen where we can fill in the fields and click Insert. Which should promptly display an intimidating error informing us that we forgot to add an insert statement to our SqlDataSource object.
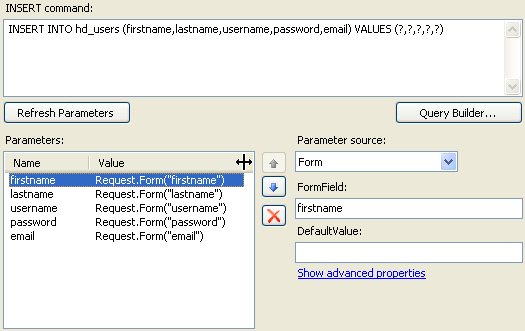
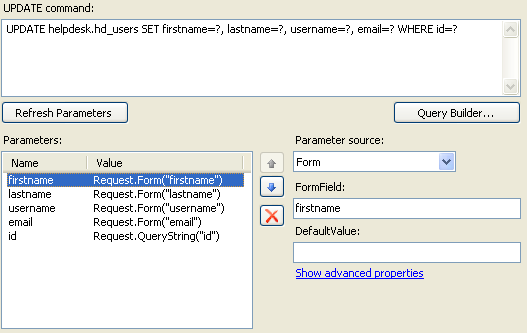
Let’s go ahead and add statements for inserting, and updating. When done you should have statements that look like these:
Of course we know it is a VERY bad idea to store passwords in clear text so we will need to hash the passwords prior to inserting. You have noticed that we have the formview updated and inserted events, but to change a value prior to inserting we will need to create a sub that handles the “FormView.ItemInserting” event. In this function we will rewrite the value of the password parameter that gets passed to the SqlDataSource so that it is hashed with an MD5 hash function built into .NET. We will also “salt” the hash with the username to make the password store more defensible against dictionary attacks. For more information about this topic, check out the Four Guys From Rolla site:
This function matches the Domino Field Traslation process but is centralized in one place instead of within all the individual fields.
Protected Sub hash_password_before_insert_or_update(ByVal Sender As Object, ByVal foo As_
System.Web.UI.WebControls.FormViewInsertEventArgs) Handles FormView1.ItemInserting
    Dim md5Hasher As New System.Security.Cryptography.MD5CryptoServiceProvider
    Dim txtBoxPassword As New TextBox
    Dim txtBoxUsername As New TextBox
    Dim hashedBytes As Byte()
    Dim encoder As New UTF8Encoding()
    Dim hashedPassword As String
    txtBoxPassword = FormView1.Row.FindControl("passwordTextBox")
    txtBoxUsername = FormView1.Row.FindControl("usernameTextBox")
    hashedBytes = md5Hasher.ComputeHash(encoder.GetBytes(txtBoxPassword.Text &_
    txtBoxUsername.Text))
    foo.Values("password") = hashedBytes
End Sub
Later on we will use this hashed password in our authentication page, but we needed to get the hashing process done so the data in the insert will match the data types in the table.
Once you have the statements, and function in place you can go ahead and add a new user. When you click “Insert”, you will be taken back to the screen that says “No registered uers with the specified id”. This is because our FormView SqlSelect statement wants a querysting parameter and if it has none it will have an empty data set to display, and therefore result in the EmptyData template. We will fix this later but I want to make a point about the default behavior of a .NET page as opposed to a Domino form.
When you are brought back to the “no registered user…” screen, click the refresh button. Depending on your browser you will be informed that you are posting data back to the page. If you click yes you will end up inserting another user with the same information as the last one. By default, a .NET form posts to itself and refreshing the page will resend the same field=value POST string. With Domino, the default behavior sends you to a “Form Submitted” page using a “GET” operation, which you override with the addition of a specially named field ($Return). In order to avoid any double inserts we will eventually need to add a redirect to another page, as a GET operation. This will eventually be our user “view” when we create it. For now, just try not to refresh after an insert. To read a particular user record you will need to append a “?id=x” (x being an existing id) onto the page URL to switch over to our “Item” (viewing) template.
Back to out FormView. I think it is pretty obvious that you can move around the fields in each template into a table for layout purposes so I will not waste any time on the niceties of formatting. As long as you know how the data binds to fields and labels, you can add tables, headers, and footers to your hearts content. For now, let’s move on to validation.
Hopefully during your “sandbox” time in the first installment you noticed that there is an entire cateogry of validation server controls, in the left-hand toolbox, to choose from. .NET does a pretty cool job on the validation piece by using a smart system of determining where the validation occurs. The .NET runtime determines if the browser can support the javascript, and if it does will write the client-side javascript required. If the client does not support javascript then all validation is server-side. But there’s more. Even if .NET creates the client side script, it still does the validation on the server. So you write all your validation in one place and get both client and server side validation.
.NET 2.0 provides you with 6 built-in validation objects:
1. RequiredFieldValidator - Simply verifies that something is in the field
2. CompareValidator - Compares user input to a specified value
3. RangeValidator - Compares user input to high and low range on text, numbers, and dates.
4. RegularExpressionValidator - Checks to see if user input matches a regular expression pattern, like phone numbers, e-mail addresses, etc..
5. CustomValidator - Write your own
6. ValidationSummary - Place all of your validation messages in one place.
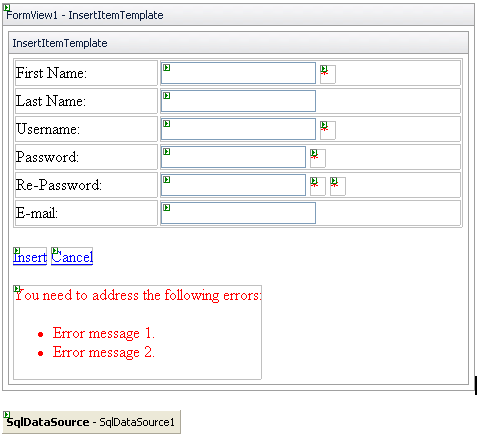
For our User form we will make use of the RequiredFieldValidator, RegularExpressionValidator, CompareValidator, and the Validation Summary. Let’s first drag and drop a RequiredFieldValidator object from the Validation category of the toolbox into our InsertItem template, right beside the first name field. In the validators properties pane change the ErrorMessage property to “First name is a required field”, and change the text property to “*”. Then change the ControlToValidate property to whatever your first name field text box object is named (in my case “firstnameTextBox”).
Now drag a VaildationSummary object into our InsertItem template (placement is not important), and in the ValidationSummary objects properties, set the HeaderText to “You need to address the following errors:”. Now save the page and view in browser. Just click Insert without typing anything and you have validation with the snap of your fingers. User name is also going to be a required field, so go ahead and create a RequiredFieldValidator for that field and without any more effort, errors from that validator will show up in the summary.
Now let’s add a RegularExpressIonValidator next to the password field, and change its ErrorMessage to “Your password must contain a number and an uppercase letter”, and change the text property to “*”. Lastly change the ValidationExpression property to “.*\d.*[A-Z].*|.*[A-Z].*\d.*” (which is complete greek to me but is what is required to insure our password complexity). Since the regular expression validator requires some text to work with, we will also need to add a RequiredFieldValidator object to monitor the password field to make sure there is some text. Once that is in place, save and view to see our validation at work.
SideNote: Play with the validators “EnableClientScript” property to get the javascript validators to work. You can set that property for any one validator, or only on the validator summary.
You might have though to yourself that our password entry method was not quite up to scratch since it did not mask the password as it was entered, and it did not require it to be re-entered. So let’s add another label and textbox right above our current label/textbox row for the password. Set the new label text property to “Password:” and set the ID of the textbox object to “passwordTextBoxFirst”. Then change the text property of the lower password label to say “Re-enter password:”. This will keep our validation and data binding unchanged with the second password field being the value that is placed in the DB.
On each of the password textbox’s we need to change the “TextMode” property to “Password” which will mask the passwords data entry with a dot.
Lastly, we can add a CompareValidator object to our InsertItem template. We already added the required field validator and a regular expression validator next to the “second” password field so let’s add the compare validator next to the first password field. Like the others, set its Text property to “*”, and then set its ErrorMessage property to “Your passwords are not the same”. Set the ControlToValidate property to the name of your “second” password field (in my case passwordTextBox), and then set the ControlToCompare property to the name of your “first” password field (in my case passwordTextBoxFirst). The Operator and Type properties default to the proper settings in our case (”Equal” and “String” respectively) so we are all set. Save and view in browser. Try entering “password” into your first password field, and then “Passw0rd” into the second field, and click Insert. We will get the error that our passwords are not the same. Try entering “password” into both password fields and clicking insert, and we will get our password complexity error. Of course the required field validators for username and first name are also triggered. How easy was that?

Let’s work on our view of users now. You know how to use a GridView object already, so let’s create a new Web Page called “userread.aspx”. When done drag a SqlDataSource object onto the form, and configure it to use our Helpdesk connection string. This time let’s customize the view to show the users name as one column instead of two. In the SELECT statement for the data source, use this:
FOR SQL SERVER USERS:
SELECT id, firstname + ‘ ‘ + lastname AS whole_name, username, email FROM helpdesk.hd_users
FOR MYSQL USERS:
SELECT id, CONCAT(firstname,’ ‘,lastname) AS whole_name, username, email FROM helpdesk.hd_users
We simply concatenated two fields together and give it an alias of “whole_name”. Notice also that I am not including the password in the select statement. When you have that done, drag and drop a GridView object onto our user view page and set its data source to our newly created one.
SideNote: If you ever change the Select statement of a data source after you bind an object like a GridView, the changes in the SQL will not be reflected until you click on the little arrow in the upper right of the GridView object, and select “Refresh Schema”.
We will not need to show the end user the ID field so click on the little arrow in the upper right of the GridView and select “Edit Columns”. In the properties of the ID column simply set its Visibile property to “False”, since we will need the value for other purposes. Also, for the GridView let’s enable Sorting, and Paging. Let’s save and view to see our out-of-the-box view with a little customization. Although we already did a delete function in our last grid view, let’s do this one a tad different.
Click on the little arrow in the upper right of the GridView object and click “Add New Column”. In the field type select “Template Field” and set the Header Text to something simple like “x”. When done you will have another column on the grid with nothing in it, but the column header with an x. Now if we click our little upper right arrow again and select “Edit Templates”, we should have a new template category listed with a name like “Column[5]-x” with 5 templates listed under that.
Open the ItemTemplate and drag in an HTML checkbox control (the one listed in the “HTML” category of the toolbox). For this bit we are going to switch over to the “Source” view of the page to customize our checkbox. Change the source code of the checkbox to match this:
<input type=”checkbox” ID=”id” runat=”server” value=’< %# Eval("id") %/>‘ />
Then using the “Edit Columns” dialog, make the checkbox the first column by using the up and down arrows to reorder them.When done, save and view in a browser. We should have our three data columns and the last column that just has checkboxes for each row. If you look at the html source of the page you will see how the “eval” statement has placed the ID field value into the value of the checkbox.
<input name=”GridView1$ctl02$id” type=”checkbox” id=”GridView1_ctl02_id” value=”1″ />
SideNote: You may have noticed that when you drag an HTML object onto your form that it does not normally contain the “runat=server” property. We need to set this property to allow our server side code access to the field value.
Next let’s create a DELETE statement for our userread.aspx SqlDataSource. The SQL statement will be the basic “DELETE FROM helpdesk.hd_users WHERE id=?”, but our parameter will be a bit different. In the following code we will programmatically set the “id” parameter, so all we need to do with the DeleteQuery is create a parameter called “id” and leave the parameter source set to “none”. Now let’s add a button to our Gridview page and set the text property to something like “Delete selected doc(s)”, and then double click on the button to expose the button click code. I’ll let you browse these various objects methods and properties on your own, so here is the code to make our delete happen.
Protected Sub Button1_Click(ByVal sender As Object, ByVal e As System.EventArgs)_
        Handles Button1.Click
    Dim row As System.Web.UI.WebControls.GridViewRow
    Dim cell As System.Web.UI.WebControls.TableCell
    Dim checkbox As System.Web.UI.HtmlControls.HtmlInputCheckBox
    For Each row In GridView1.Rows
        cell = row.Cells(0)
        checkbox = cell.Controls(1)
        If checkbox.Checked Then
            SqlDataSource1.DeleteParameters("id").DefaultValue = checkbox.Value
            SqlDataSource1.Delete()
        End If
    Next
End Sub
As you can see, the level of control over various objects, like the gridview, is VERY granular which makes it a very powerful platform. So let’s save and view to see how our delete works. Check one or two of the checkboxes, click the delete button and bingo, all gone.
You may have noticed that we are missing a link to view/edit each entry so let’s go back to the viewread.aspx gridview object, and open up the dialog to add a new column. In the column type, select HyperLinkField, in the header text type “Full Name”, in the HyperLink text field select “Get Text From Data Field” and in the text box type the sql alias for our concatentated name field (in my case whole_name). In the Hyperlink URL section select “Get URL from data field”, and in the text box enter “id”, and in the URL Format String field type “useredit.aspx?id={0}”. Then click OK. Use the Edit Columns dialog to make our new column the second in line, and delete the old whole_name column. Save and view to see the new link column in action.
The last pieces I will leave up to you. You are aware that when you follow the link you end up in read mode so add a button to the useredit.aspx page that will switch the FormView to Edit mode. Then add another button to the userread.aspx page that can be used to create a new user. In the button click event for this new button use some code like this:
Page.Response.Redirect(”useredit.aspx”)
Then in the page_load event of the useredit.aspx page we can add this code that looks for the “id” querystring parameter, and if it is not found will switch the user over to insert mode.
Protected Sub Page_Load(ByVal sender As Object, ByVal e As System.EventArgs)_
       Handles Me.Load
    If Request.QueryString("id") = "" Then
        FormView1.ChangeMode(FormViewMode.Insert)
    End If
End Sub
Another thing you may notice is that after an insert or update you are not going back to the userread.aspx page. With .NET we have post-insert and post-update events where we can return the user to a specified page. This is the equivalent of the $Return field. Just add these two events to the useredit.aspx page and take some time to really understand what they do.
Protected Sub return_from_insert(ByVal sender As Object, ByVal foo As_
 System.Web.UI.WebControls.FormViewInsertedEventArgs) Handles FormView1.ItemInserted
        Response.Redirect("userread.aspx", True)
End Sub
Protected Sub return_from_update(ByVal sender As Object, ByVal foo As_
 System.Web.UI.WebControls.FormViewUpdatedEventArgs) Handles FormView1.ItemUpdated
        Response.Redirect("userread.aspx", True)
End Sub
So what is the difference between the DetailView and the FormView? For the most part the biggest difference is the amount of formatting effort needed to make it look decent. The Detail view is really easy and fast but doing validation on individual fields becomes alot more tedious.
So hopefully we now have a fully functional, albeit spartan, form and view for our help desk users. Next installment will focus on security since that is a very big strength of DOmino. We will cover logging in with our custom form, a short installment about authenticating against LDAP, and against Active Directory, along with the more granular security of user roles. So for now, explore the details of some of the objects and methods that we touched on, and stay tuned.
Also, here is what the code should look like. Be VERY aware that you will need to make changes to the web.config file for any database connection strings.
January 15th, 2006 at 5:38 pm
This is beyond cool. Thank you for sharing your knowledge. Your tutorials are great but they also make me sad because I see Domino (still my fav platform…) lagging behind Microsoft’s tools.
January 15th, 2006 at 6:33 pm
Thanks a bunch Roman! I’ll have Part 5 out this week, a little later than normal (stupid real life commitments!!). As for Domino lagging, all I can hope for is that R8 will bring some renewed focus and a whole bunch more power. Don’t be sad; this is technology and you never really leave it behind. Probably 50% of my work now is integration with DOmino, .NET, and legacy systems, so knowledge along these bounds will keep you in high demand.
January 16th, 2006 at 3:16 pm
Thanks for the articles… always interested in considering and learning about other technologies.
I must admit I am just becoming familiar with the latest R7 release and so not really sure what folks consider to be lacking in R7 vis-a-vis things like .net What would you consider as necessary for R8 to include for its renewed focus and to be competitive.
January 16th, 2006 at 5:22 pm
Well xing, it is less an argument of how well it works, and more an argument of what you cannot do with the tool (and therefore what customers will perceive as a good bet).
1. Mobile development: how easy is it to create a domino form without javascript?
2. Web services: It was really nice that IBM finally got around to including web services in R7, but they are only one way (providing). No application is an island, they all need to integrate
3. I have not finished testing on R7, but I do not think they ever fixed the 32k inbound limit on web services.
4. A VERY old, and barely compliant HTML rendering engine that is showing its age.
5. No programmatic access to the inbound stream (either text or binary)
6. No programmatic access to the users session (leaving the developer with cookies or temporary documents).
7. The Notes client is still clumsy. Considering where UI design has evolved to, I had hoped for some significant work here.
I have other hopes, but these are the major points. I have high hopes for R8 as I think R7 was the first “All-IBM” release, and they had alot of Notes admin functions they wanted to add to please the fortune 500 companies (IBM lives to please that crowd, whereas Lotus was more medium size business oriented).
I am by no means a convert, but I have alot more difficulty making an argument for Domino applications considering what I know of .NET. MS has used the talent they have hired away from IBM/Lotus, and I worry that if IBM cannot do some serious work with R8, that .NET 3.0 will tip the balance.
January 20th, 2006 at 5:12 am
Still playing catch up with your articles, but the’re very informative. Keep them coming, assuming you have the time!!!
January 20th, 2006 at 5:06 pm
Although the last few weeks have been interesting, I am finalizing the 5th installment and hope to have it out Monday.
March 10th, 2006 at 4:26 am
Thanks for the articles they have been a god send to me just starting using ms vwd and sql express had an idea for something designed the tables had no idea how to get it to work in vwd but your articles have given me hope. thanks. i have one question in the table you created you have used something called BLOB but i dont see anything like that in sql express unless its called something please could you help. regards Jason (UK)
March 10th, 2006 at 8:24 am
BLOB is a MySQL data type, and I believe the equivalent in SQL is binary (BLOB stands for Binary Large Object something……).
April 12th, 2006 at 10:02 am
[…] If any of you got through .NET for Domino Developers Part 4 you have seen how easy the .NET Gridview object is to deliver views to the end user. Yet if You have ever looked at the XML source code of a .NET page, you will see that each column is a seperate object with different parameters depending on the column type (columns bound to a field, link columns, template columns). This means that each column object can be programmatically created, and placed on the page at runtime. Couple the ability to dynamically create and place view columns, with the ability to dynamically build your database queries, and you will have a truly powerful view/report structure. So one view-page can service an almost infinte number of reports/views. […]
May 8th, 2006 at 11:57 am
Very, VERY informative. Thank you!